August 31, 2011

Giveaway Winner Project! -Upcycling Book Crafts from an un-crafty me


...Took on my little challenge to create and post a project for my cRaFty -ArTsy Giveaway last week, and won.

I am in love with the bold vintage colors (especially reds, yellows, blues, and greens) that they printed back in the 1950's and earlier!

Christy shared- "I've taken apart the book and cleaned it up a bit, inserted scrapbook pages to hold photos of my sister at fairs with her lambs and created some neato envelopes to glue inside.  Now I just need to get ahold of some recycled blank paper to put in-between the original story pages.  I'll have it bound and my sister will have one of the only crafty things I've ever made as a keepsake."


Thanks Christy, I love love them!


August 30, 2011

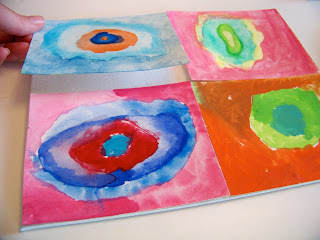
{tutorial} Make your own "mini" Water Color Abstract Murals- Summer Art Class

Wee water color murals (inspired from our Huge Wassily Kandinsky Abstract Mural we made) for the bathroom or small wall space! They can go anywhere. You can make one or a set of 2 or 4 or more. There are endless ideas with these! Just don't be scared to jump in, it's really simple...
(Obviously they need to be framed, I just balanced one on top of the black frame with glass)


Materials Needed:

  • Mod Podge
  • plastic wrap
  • pre-stretched canvas- your choice in size (we used both stretched canvas & canvas on hard board- the hard board is longer lasting-less cracking/flexing)
  • large brush
  • heavy books for stacking/weight/drying
  • your WATERCOLOR circle artwork - cut water color paper rectangles (pre-measured to fit on your own canvas) or you can paint circles with ACRYLIC - my short painting circle tuturial is HERE (Part 1-painting the circles)


I took plenty of photos to give you visual directions so you don't have to read...


After you have cut and measured the water  color paper to fit on your preferred size of canvas, painted them, and they are completely dry... 


(I always like to arrange things to make sure they fit and the color scheme works.)


Apply the Mod Podge a little less generously to the back of the square paper...


Place the square in one of the corners and smooth over with your hand on top of the plastic wrap. The plastic protects the artwork and the books and anything else that wants to stick to the Mod Podge!...


Place heavy books on top of the artwork with plastic wrap and allow at least 15+ mins. for dry time for each application...


You can see I am drying (and smashing) both murals... I usually do at least 2 rectangles at a time...


Almost done...


Okay, now both are completely dry (they dried overnight).  Now I am applying the exterior protective coat to both...


In the photo you can see the thickness of Mod Podge applied. I applied 3 exterior coats to both murals (I like to wait a few extra hours to make sure they are completely dry).


Aren't these cool? You can frame them or paint the edges to finish them up.

Thanks for looking! I love these. Hope you enjoyed and will make one or two yourself or with your kids!


August 26, 2011

The WINNERS of the ArTsY - CrAfTy GIVEAWAY are...

I was thrilled to see all of your creative entries via Linky or emailed to me! They are so cool! THANKS FOR PARTICIPATING EVERYONE! I wish I could give each person a gift for every giveaway! 

The Winners for the 

I put all the names in a bowl with all of the extra entries, and one by one (I did have to close my eyes because the names are showing!),  here they are... 

There isn't a drum roll sound... 
just me...

#1 Christy's with her "Upcycling Journal"

#2 Honey Mommy with her "Paint Splatter Party"

and #3 Amber with her "Crafty Paper People"


CONGRATULATIONS!


Don't forget I will be posting their 3 projects each week!


August 19, 2011

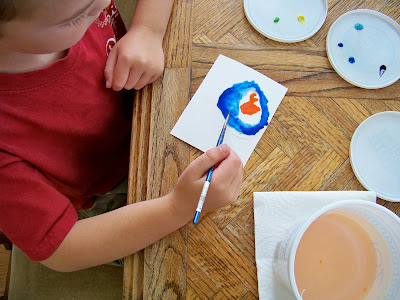
We're making "mini" murals, water color! - Summer Art Class

Hey, remember that humongo ABSTRACT CIRCLE MURAL the 2nd graders made with me back in May?... 


...Well, we're making just wee ones! Only instead of painting with acrylic, we're using water colors...


Last art project this summer with my 5 - 8 year-olds... aren't they wonderful?


Painting together... ah sweet!


I'll keep you posted on the "wee abstract mural tutorial" soon...


August 16, 2011

sEa cReAtUrEs Hanging Mobile #3 & #4 - Summer Art Class

The rest of the OCEAN has arrived...
more hanging sEa CrEaTuReS!


Can't believe these are 5 -7 year-olds!


If you want to "SEA" how to make one, here's the TUTORIAL on how to-click on the link below:


August 12, 2011

The Creatures that "found us" at the Pond- count 'em

After camping out the night before, with a small salamander(1), sandhill cranes(2), loads of mosquitos(3), and several(loads!) small bugs(4), we woke up to this glassy pond!


Loading in the boat without accidents...

A silly little frog(5)...                                         


The snails(6) were actually floating!

 Not captured in photo were: enchanting butterflies(7) and dragonflies(8), the millions of wee minnow fish(9), and the most blood curdling  and nastiest of them all were the black & brown  leeches(10) that found us no matter where we went- scream! We're all glad I didn't take pictures of the one very grande leech with babies attached...


Enjoy the outdoors while you can, Summer is almost over! Thanks for looking around my wee blog.


*Note to all nature lovers: All of the creatures caught this day were safely released back into the wild...


August 10, 2011

CrAfTy - ArTsY CHALLENGE & GIVEAWAY (Closed)

Alright, some of you might have read that I mentioned I wanted to do a CrAfTy-ArTsy CHALLENGE with GIVEAWAYS attached. Yaya, you have to earn this giveaway! 


Now, first off I want you to know that anything will work for my challenge-anything that you (you don't have to have kids to enter either!) or your kids have created that is. MAKE IT SIMPLE, and if you already have one to share/enter, perfect. If not, sweet, make one for the challenge. 


*Please read this so you have an idea of what goes...
You can enter  KID or ADULT crafts or art projects, DIY projects, crafty or artsy tutorials, educational projects, Summer outings with projects, or thrifty, recycled, repurposed, upchucked projects, a tutorial on using an art/craft medium/material with intentions... (sorry, except headbands or barrettes- things like that) Basically, you get my point, right? 


The GIVEAWAY items are 3 of my Art print greeting cards (8 pk) to 
3 lucky people who take on the challenge. 
Names will be drawn on Thursday, Aug. 25th, 2011.


Great let's get started! ... I am elated for any and every entry, so don't be shy!


Challenge & Giveaway Details:


*Share your link to your project at the bottom of this post on Linky
*If you can't post your project on Linky, please email me @ candiceashment@gmail.com with photo/s and details of how you made it and leave a comment on this post.


Extra Entries:


1 extra *Follow my blog (already here- but you need to be a "follower" ;) 
1 extra *Be a Candice Ashment Art Face Book fan here
1 extra *Share this Giveaway post on your blog
1 extra *Share this Giveaway post on your Face Book 
3 extra *Share and have a friend/s enter challenge/giveaway and tell me your name so I can give you extra entry points!


Remember E-A-S-Y and F-U-N, because I'm going to share them at the end of the month here on the blog! Yippee

simple... simple... simple... simple... simple... you can do it!


TO SEE THE WINNERS GO HERE


Enter here on the bright blue Linky:

August 07, 2011

sticks


We went on a family camping & boating trip this weekend... I couldn't resist sharing the spooky, spindly remains of trees in the water. 

Eery, simple, beautiful...

More photos to come of what my kiddos found in the water.

August 05, 2011

Make your own sEa cReAtUrEs MOBILE {sort of Tutorial} - Summer Art Class


Hanging mobiles are so cool... I want one in my room too...


The Simple Materials I Used:
  • TULLE MATERIAL --  (any color/s you fancy!)
  • WOODEN CIRCLE/embroidery hoop -- (or anything circular you can paint and hang)
  • ACRYLIC PAINT  -- (any color you fancy also!)
  • HOT GLUE -- (to adhere the tulle to the hoop for hanging)
  • sEa cReAtUrE drawings -- (I used clear adhesive sheets on both sides to protect artwork and make sturdy. Or instead of clear sheets, apply 3 coats of Modge Podge on both sides.)
  • SMALL HOLE PUNCH -- (or large needle) In order to hole & string up and attach each drawing.
  • THREAD/ string/clear fishing line 

Quick steps below...


I always look at directions and visuals to recreate an object/recipe and then change it however I/we fancy, feel free to change it up for kids or yourself!
  • We painted the wooden hoop a solid color and let it dry. 
  • Then painted black or white circles on the hoops.
  • Next we cut the tulle into 4 strips (cut them the length of your "hang liking") and hot glued them (preferably middle of length) to the inside of the hoop and tied them in a knot to hang (look at the photos for reference -I'm all about visual instruction!)
  • The tulle is really great for attaching thread (thread a needle to make it easy to get the string through the holes of the tulle) and space your string where ever you want to hang your drawings/objects
  • Punch your holes into drawings, string up, and tie. You're pretty much complete, just takes a while to get them all up!

......................  ......................  .....................  ......................


Click here to see the sEa cReAtUrE drawings we created for this hanging mobile project!

I will be posting 2 other sEa cReAtUrE hanging mobiles shortly!(go here to see the rest #3 & #4 mobiles)


August 02, 2011

MY "Summer Sanity" BIKE TRAIN!

"Caboose," "bike train," "kid-pulling machine"... it's been called many things...


Just in case you were wondering how I stay a sliver of a fraction sane... 

Many of you have seen me on this contraption around town or on trails. This is my "SUMMER SANITY" all in one. Gets my kids out of the house (3 kids to be exact! -one being a year old -every momma knows my pain and joy all at the same time with that age), me out of the house, beautiful views, kids are quiet (because they have to concentrate on getting up the hills), fun times, and good hard exercise ALL IN ONE!

My son questioned me the other day while riding up a hill, "Mom, why doesn't Adael (my 8 year-old daughter) have to push you up the mountain?" She rides her own bike, he rides the tag-along behind me. I replied, "So you think you're pushing me up this hill? Well, it's because you are so strong!" Couldn't believe my ears. Sometimes I can actually watch him just sitting and looking around, as if it were a Sunday stroll...

Enough said... I LOVE MY BIKE TRAIN!